Tuesday, July 31, 2012

Watermelon Farming


I am officially declaring myself a full fledged watermelon farmer.  At last count, I had 19 watermelon growing in my garden.  I am so excited about these watermelon because I have been documenting their growth from the very beginning.


These were the first leaves that sprouted out of the ground about 2 weeks after we planted the seeds.  


One week (and lots of water) later, our watermelon plants started to take shape.
 

Six weeks into the season, the plants had grown into vines.


It wasn't long after that I saw the first flowers.


 And where there are flowers - there are baby watermelon!


Over time these tiny watermelon grew, and grew...

 
into gigantic watermelon!


I planted 3 different varieties of watermelon.  (Watermelon Jubilee, Sugar Baby and a Seedless variety.)  Yes, we actually planted SEEDS to grow SEEDLESS watermelon - ironic don't you think?  The hardest part of being a watermelon farmer is waiting for the fruit to ripen. I was so excited to pick the first watermelon and slice it open.

My first watermelon was a sugar baby.  Weighing in at just under 3 pounds, this sweet little sugar baby was beautiful.  (Can you tell that I am a proud momma?) 


I sliced it and we ate it in one day.  I am loving these juicy, sweet and tiny watermelon that doesn't take an army of people to eat.  This one had tons of seeds but it was really yummy. 


I have been doing all sorts of research on watermelon recipes so do not fear - LOTS of watermelon recipes coming to the blog in the near future.  If you have a favorite way to eat watermelon - please let me know.  We have lots of watermelon to eat in the next few weeks.

Ciao!

Monday, July 30, 2012

Swirled Bread


Homemade bread is my weakness.  I love baking bread - especially in July when the humidity is at an all time high.  This bread is a combination of white and wheat breads swirled together.  It certainly ROSE beyond my expectations.

Two Tone Bread
5-51/2 cups flour                 1/3 cup shortening
5 teaspoons yeast                1 Tablespoon salt
3 cups milk                          3 Tablespoons molasses
1/3 cup sugar                       2 ½ cups whole wheat flour

Combine 3 ¼ cups flour and yeast and salt in mixing bowl.  In saucepan, heat milk, shortening and sugar until warm and shortening is almost melted.

 
Add to flour mixture.  Beat on high speed for 3 minutes.  Remove 2 ½ cups batter.  Add enough white flour to 1 batch of batter to make a soft dough.  Knead 6-8 minutes.  To remaining batter, add molasses and wheat flour.  Knead 6-8 minutes.  Shape each dough into a ball and place in separate greased bowls, cover and let rise for 1 hour. 

 
Divide each dough in half.  Roll out ½ of the white dough into a rectangle.


Roll wheat dough into a rectangle of the same size.


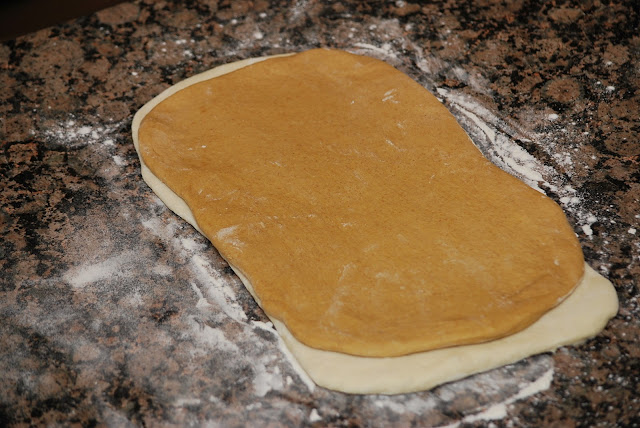
 Place the wheat dough on top of the white dough.


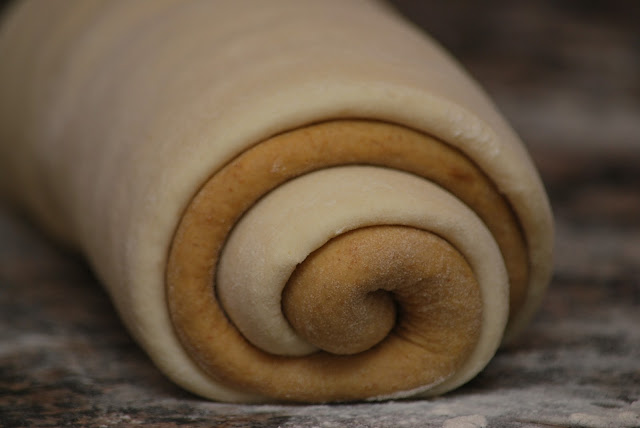
Beginning from a short side, roll up dough to form a loaf.


Place in a greased loaf pan. Repeat with the remaining dough.  Cover and let rise 45 minutes to 1 hour.  Bake 30-35 minutes at 375.             

So I set the bread outside on the screened in porch to rise while I headed to the pool for a mini swim break with my favorite daughter.  When I came home an hour later, this is what my bread dough looked like...


Gotta love Atlanta humidity in July.  I think this may be the biggest loaf of bread that I have ever made.

As gigantic as they were, these loaves baked up beautifully.


When you slice into the loaf, you reveal the beautifully swirled white and wheat breads inside.


Eating this oversized bread made everyone feel like a giant.


It's hard to tell just how big this loaf bread really was so I put it next to a slice of sandwich bread so that you could see the size difference.


 This recipe makes 2 loaves of bread so you can easily freeze one for another day.


Ciao!
Saturday, July 28, 2012

Tomato Gratin


I didn't plant any tomato plants in my garden this year but luckily for me - my friends did!  (And they share.)  I ended up with a lot of really beautiful homegrown tomatoes this week (thanks to my generous friends) so I made the tomato gratin from the new issue of Cook's Country.

I made a half of a recipe because I really didn't expect anyone else in my family to appreciate these roasted gems.  I will give you the halved version of the recipe but if you want to double it, you can make the same recipe in a 9x13 pan.

Tomato Gratin
1 1/2 pounds plum tomatoes (I used Roma's)
1/4 teaspoon sugar
1/2 cup panko
1/2 cup Parmesan cheese
2 Tablespoons olive oil
1/2 onion, sliced thin
1 teaspoon chopped fresh thyme
1 clove garlic, sliced

Slice tomatoes into 1/4 inch thick slices.  Toss with 3/4 teaspoons salt and sugar.  Let sit for 30 minutes.


Combine panko, Parmesan, 1 Tablespoon oil, 1/4 teaspoon salt and 1/8 teaspoon pepper.


Heat 1 Tablespoon oil in skillet.  Add onions.  Cook until softened.
 
 
Add garlic and thyme and cook 30 seconds.  Season with salt and pepper.


Spread onion in the bottom of a greased 9 inch square baking pan.


Transfer tomatoes to a salad spinner and spin to remove excess moisture.


Arrange tomatoes over onions.  Sprinkle with pepper.

 
Bake 15 minutes at 450.


Sprinkle evenly with panko mixture


Bake another 10 minutes. 


I wish that you could have smelled this tomato gratin cooking in the oven.  It was absolutely intoxicating.  Fresh tomatoes, garlic, sauteed onions - a delight for my nose.   Fresh Parmesan cheese, crunchy panko topping and slow roasted tomatoes - a delight for my mouth. 


This was so good that we ended up eating the entire pan in one meal.  So much for my theory that I only needed a half recipe.  If you have a bumper crop of tomatoes (or really good friends who are tomato farmers and are willing to share) you need to give this recipe a try. 

Ciao!